Intro
I want to create the Azure resources needed to build Azure Functions in this post. I will guide you through the necessary bicep files to deploy a Storage Account, Application Insights, App Service Plan, and the Azure Function. You will deploy everything with code by the end of this post, including a demo function.
All code can be found on GitHub .
Workflow
As shown below, the workflow is:
- Creating Storage Account
- Creating Azure Application Insights
- Creating Azure App Service Plan
- Creating Azure Function
- Deploying demo function to the Function App.

Storage Account
First, I need to create a storage account to support the application insights I will be making in the next step. The storage account is a simple resource with few parameters. Below is the template I used to create the storage account.
Source for information on Storage Account and Bicep
param name string
@allowed(\[
  'BlobStorage'
  'BlockBlobStorage'
  'FileStorage'
  'Storage'
  'StorageV2'
\])
param kind string = 'StorageV2'
@allowed(\[
  'Premium\_LRS'
  'Premium\_ZRS'
  'Standard\_GRS'
  'Standard\_GZRS'
  'Standard\_LRS'
  'Standard\_RAGRS'
  'Standard\_RAGZRS'
  'Standard\_ZRS'
\])
param skuName string = 'Standard\_LRS'

resource storageAccount 'Microsoft.Storage/storageAccounts@2021-06-01' = {
  name: name
  location: resourceGroup().location
  kind: kind
  sku: {
    name: skuName
  }
}
Application Insights
I use application insights to gather information like requests, response times, and several other information that is nice to have. I configure my resource to support a web application since Function Apps is a special web application defined by Microsoft. The Bicep file is pretty simple, but I want to point out the two output lines at the bottom of the file. The output lines return the instrumentationKey and the resource’s name to my main file. I do this because I need both information later on in my deployment.
Source for information about Application Insights and Bicep.
param appInsightsName string
@allowed(\[
  'web'
  'ios'
  'other'
  'store'
  'java'
  'phone'
\])
param kind string = 'web'

@allowed(\[
  'other'
  'web'
\])
param Application\_Type string = 'web'

resource appInsights 'Microsoft.Insights/components@2020-02-02' = {
  name: appInsightsName
  location: resourceGroup().location
  kind: kind
  properties: {
    Application\_Type: Application\_Type
    publicNetworkAccessForIngestion: 'Enabled'
    publicNetworkAccessForQuery: 'Enabled'
  }
  tags: {

  }
}

output instrumentKey string = appInsights.properties.InstrumentationKey
output insightsName string = appInsights.properties.Name
App Service Plan
The App Service Plan hosts websites and Functions Apps. I have only focused on the Function App in this demo, so if you want to deploy websites, there might be additional settings to configure. In my Bicep file, I have added allowed values on my parameters. I use these to ease the use of the file, so the next person using it can look up valid values instead of guessing the input.
Source for information on App Service Plan and Bicep.
param appServicePlanName string
@allowed(\[
  'B1'
  'B2'
  'B3'
  'D1'
  'F1'
  'FREE'
  'I1'
  'I1v2'
  'I2'
  'I2v2'
  'I3'
  'I3v2'
  'P1V2'
  'P1V3'
  'P2V2'
  'P2V3'
  'P3V2'
  'P3V3'
  'PC2'
  'PC3'
  'PC4'
  'S1'
  'S2'
  'S3'
  'SHARED'
  'Y1'
\])
param skuName string = 'Y1'

@allowed(\[
  'Shared'
  'Free'
  'Basic'
  'Standard'
  'Premium'
  'PremiumV2'
  'Isolated'
  'Dynamic'
\])
param skuTier string = 'Dynamic'

resource appServicePlan 'Microsoft.Web/serverfarms@2021-02-01' = {
  name: appServicePlanName
  location: resourceGroup().location
  sku: {
    name: skuName
    tier: skuTier
  }
}

output id string = appServicePlan.id
Function App
The Function App is the most complicated resource in this demo. To deploy the resource, I also need information from the previous steps and information from two websites. I want to deploy a PowerShell Function App and bind it to application insights and the App Service Plan.
Source for information on Azure Function App and Bicep
and here
param functionAppName string
param appServerPlanId string
param applicationInsightsKey string
param storageAccountName string

resource storageAccountLookup 'Microsoft.Storage/storageAccounts@2021-06-01' existing = {
  name: storageAccountName
}

resource functionApp 'Microsoft.Web/sites@2021-02-01' = {
  name: functionAppName
  location: resourceGroup().location
  kind: 'functionapp'
  properties: {
    httpsOnly: true
    serverFarmId: appServerPlanId
    clientAffinityEnabled: true
    siteConfig: {
      appSettings: \[
        {
          'name': 'APPINSIGHTS\_INSTRUMENTATIONKEY'
          'value': applicationInsightsKey
        }
        {
          name: 'AzureWebJobsStorage'
          value: 'DefaultEndpointsProtocol=https;AccountName=${storageAccountLookup.name};EndpointSuffix=${environment().suffixes.storage};AccountKey=${listKeys(storageAccountLookup.id, storageAccountLookup.apiVersion).keys\[0\].value}'
        }
        {
          'name': 'FUNCTIONS\_EXTENSION\_VERSION'
          'value': '~3'
        }
        {
          'name': 'FUNCTIONS\_WORKER\_RUNTIME'
          'value': 'powershell'
        }
        {
          name: 'WEBSITE\_CONTENTAZUREFILECONNECTIONSTRING'
          value: 'DefaultEndpointsProtocol=https;AccountName=${storageAccountLookup.name};EndpointSuffix=${environment().suffixes.storage};AccountKey=${listKeys(storageAccountLookup.id, storageAccountLookup.apiVersion).keys\[0\].value}'
        }
      \]
    }
  }
  dependsOn: \[
  \]
}
Main Bicep file
The Bicep files above are modules I use from a main.bicep file. I use modules to make deployments easier to read and use. For me, splitting the code from parameters is an easier way to understand and deploy resources in Azure using Bicep. The code below is my main file, which I will point to in my Azure DevOps pipeline.
param storageAccountName string = 'bicepappstorage'
param applicationInsightsName string = 'BicepAppInsights'
param appServicePlanName string = 'BicepAppServicePlan'
param functionAppName string = 'CloudninjaBicepFunctionApp'

module storageAccount '../Modules/StorageAccount.bicep' = {
  name: storageAccountName
   params: {
     name: storageAccountName
     kind: 'StorageV2'
     skuName: 'Standard\_LRS'
   }
}

module applicationInsights '../Modules/ApplicationInsights.bicep' = {
  name: applicationInsightsName
  params: {
    appInsightsName: applicationInsightsName
    Application\_Type: 'web'
    kind: 'web'
  }
  dependsOn: \[
    storageAccount
  \]
}

module appServicePlan '../Modules/ApplicationServicePlan.bicep' = {
  name: appServicePlanName
  params: {
    appServicePlanName: appServicePlanName
    skuName: 'Y1'
    skuTier: 'Dynamic'
  }
  dependsOn: \[
    applicationInsights
  \]
}

module functionApp '../Modules/FunctionApp.bicep' = {
  name: functionAppName
  params: {
    applicationInsightsKey: applicationInsights.outputs.instrumentKey
    functionAppName: functionAppName
    hostingPlanId: appServicePlan.outputs.id
    storageAccountName: storageAccountName
  }
  dependsOn: \[
    storageAccount
    applicationInsights
    appServicePlan
  \]
}
Demo function
I have created a demo function to show that the Function App is working as expected. The demo function is the same as my previous article, you can find the article here
, and the code will be on my GitHub
.
Azure DevOps pipeline
With the code in place, I can now focus on deploying the code. I will use Azure DevOps pipelines for the deployment, and if you have read any of my other articles, some of this code will be familiar to you. First, I will validate my templates and then deploy them. If the validation and deployments go as planned, I will deploy a demo function to the Function App. Below is the YAML code for the pipeline.
trigger:
- master

pool:
  vmImage: ubuntu-latest

variables:
  azureServiceConnection: 'Cloudninja'
  resourceGroupName: 'BicepDemo'
  location: 'WestEurope'
  templateFile: 'Deployments/main.bicep'

steps:
- task: AzureCLI@2
  displayName: 'Validate template'
  inputs:
    azureSubscription: $(azureServiceConnection)
    scriptType: 'bash'
    scriptLocation: 'inlineScript'
    inlineScript: az deployment group validate --resource-group $(resourceGroupName) --template-file $(templateFile)

- task: AzureCLI@2
  displayName: 'Deploy Azure Functions'
  inputs:
    azureSubscription: $(azureServiceConnection)
    scriptType: 'bash'
    scriptLocation: 'inlineScript'
    inlineScript: az deployment group create --resource-group $(resourceGroupName) --template-file $(templateFile)

- task: ArchiveFiles@2
  inputs:
    rootFolderOrFile: '$(System.DefaultWorkingDirectory)/Functions'
    includeRootFolder: false
    archiveType: 'zip'
    archiveFile: '$(Build.ArtifactStagingDirectory)/$(Build.BuildId).zip'
    replaceExistingArchive: true

- task: AzureFunctionApp@1
  inputs:
    azureSubscription: $(azureServiceConnection)
    appType: 'functionApp'
    appName: 'CloudninjaBicepFunctionApp'
    package: '$(Build.ArtifactStagingDirectory)/$(Build.BuildId).zip'
    deploymentMethod: 'auto'
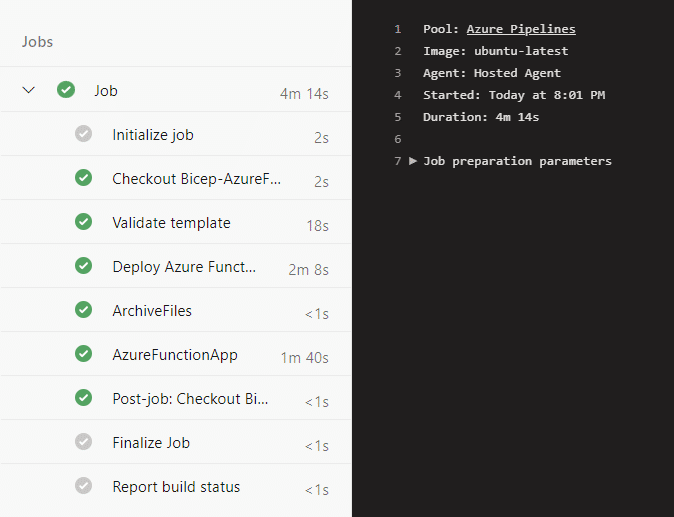
The result from the pipeline is shown below.
The resource group in Azure will look like this.

The demo function looks like this.

Summary
I hope this post will help you create new Azure Functions Apps and Azure Functions. As I showed in this post, using code enables you to create new Function Apps fast and efficiently. The code also allows more people to create the Function Apps while still ensuring the resource to comply with company standards. If you have any questions, reach out on Twitter or this website.