Intro
Azure Template Specs is an option for storing Azure ARM templates inside Azure to ease sharing templates across your organization. Accessing Template Specs is controlled with RBAC assignments, making Template Specs security like most other Azure resources. Template Specs deploys resources in Azure and is compatible with the tools we know already, so PowerShell, Azure CLI, Pipelines, and the Azure Portal.
To deploy from a Template Spec, a user only needs “Reader” permissions to the Template Spec, but permissions to create the resource in Azure are also required.
I like to use Azure DevOps or GitHub Actions to deploy resources in Azure, so for me, Template Specs offer a way to share the templates I use with users/admins who are not comfortable with coding.
In this post, I want to show you how to add templates to Azure Template Specs and keep templates up to date using Azure DevOps Pipelines. I will also show how to deploy Azure resources from the portal using the template I uploaded to Template Specs.
More information on Template Specs is in the Microsoft Docs section here:
Requirements
For Azure PowerShell, you must have version 5.0 or later installed and the AZ Modules. For Azure CLI, you must have version 2.14.2 or later installed.
Create Bicep template
If you have read my blog before, you know that I prefer to use Bicep instead of ARM templates. In this post, I will be creating a simple VM without domain join. I have added descriptions and default values to this template. The reason for adding these is that Template Specs will use these values. Each description will translate into the help text for each parameter, and the default values can help ease the deployment.
param VMName string

@description('Select the Virtual Network the VM should be deployed to')
@allowed([
  'vnet-sharedservices-001'
  'vnet-wvd-001'
])
param vNetName string = 'vnet-sharedservices-001'

@description('Local administrator username')
param adminUsername string = 'azureadmin'

@description('Password for the local administrator')
@secure()
param adminPassword string

@description('Select the subnet the VM should be deployed to')
@allowed([
  'snet-sharedservices-001'
  'snet-sharedservices-002'
  'snet-wvd-sharedservices-001'
  'snet-wvd-hostpool-001'
])
param subnetName string = 'snet-sharedservices-001'

@description('Select the virtual machine size')
@allowed([
  'Standard_B2ms'
  'Standard_B2s'
])
param VMSize string = 'Standard_B2ms'

@description('Select the resource group that the virtual network belongs to')
@allowed([
  'rg-sharedservices-network-001'
  'rg-wvd-network-001'
])
param vNetResourceGroup string = 'rg-sharedservices-network-001'

@description('Example: {"Environment":"demo","Owner":"IT"}')
param tags object = {
  Environment: 'demo'
  Owner: 'Martin'
}

resource NIC 'Microsoft.Network/networkInterfaces@2021-03-01' = {
  name: '${VMName}-nic-1'
  location: resourceGroup().location
  properties: {
    ipConfigurations: [
      {
        name: 'ipconfig1'
        properties: {
          subnet: {
            id: '/subscriptions/${subscription().subscriptionId}/resourceGroups/${vNetResourceGroup}/providers/Microsoft.Network/virtualNetworks/${vNetName}/subnets/${subnetName}'
          }
          privateIPAllocationMethod: 'Dynamic'
        }
      }

    ]
  }
  tags: tags
}

resource VirtualMachine 'Microsoft.Compute/virtualMachines@2021-07-01' = {
  name: VMName
  location: resourceGroup().location
  properties: {
    hardwareProfile: {
      vmSize: VMSize
    }

    osProfile: {
      adminPassword: adminPassword
      adminUsername: adminUsername
      computerName: VMName
      windowsConfiguration: {
        enableAutomaticUpdates: true
        timeZone: 'W. Europe Standard Time'
      }
    }
    networkProfile: {
      networkInterfaces: [
        {
          properties: {
            primary: true
          }
          id: NIC.id
        }
      ]
    }
    storageProfile: {
      imageReference: {
        publisher: 'MicrosoftWindowsServer'
        offer: 'WindowsServer'
        sku: '2022-datacenter-azure-edition'
        version: 'latest'
      }
      osDisk: {
        createOption: 'FromImage'
        name: '${VMName}-OSDisk-1'
      }
    }
  }
  tags: tags
  dependsOn: [
  ]
}
Azure DevOps pipeline
I want to use the Azure DevOps pipeline for three things,
- Validate Bicep template
- Convert Bicep template to ARM template
- Update Template Specs with a new version of the template
The first part of the pipeline will be the validation, and the code below performs just that.
trigger:
- master

pool:
  vmImage: ubuntu-latest

variables:
  azureServiceConnection: 'Cloudninja'
  resourceGroupName: 'rg-templatespecs-001'
  location: 'WestEurope'

steps:
- task: AzureCLI@2
  displayName: 'Validate template'
  inputs:
    azureSubscription: $(azureServiceConnection)
    scriptType: 'bash'
    scriptLocation: 'inlineScript'
    inlineScript: 'az group deployment validate --resource-group $(resourceGroupName) --template-file TemplateSpecs/VirtualMachine.bicep --parameters VMName=vm-demo-001 adminPassword=lda432Pdanda'
Next, I want to convert my Bicep template to an ARM template. I performed the conversion by adding the snippet below to the pipeline YAML file.
- task: AzureCLI@2
  displayName: 'Convert template'
  inputs:
    azureSubscription: $(azureServiceConnection)
    scriptType: 'bash'
    scriptLocation: 'inlineScript'
    inlineScript: 'bicep build TemplateSpecs/VirtualMachine.bicep --outfile $(Build.ArtifactStagingDirectory)/VirtualMachinen.json'
The last part of the pipeline is to update Template Specs in Azure with the new version of the template. I am using the date and time for my version numbering. I add the snippet below to the pipeline.
- task: AzurePowerShell@5
  displayName: 'Update Template Specs'
  inputs:
    azureSubscription: $(azureServiceConnection)
    ScriptType: 'InlineScript'
    Inline: |
      $Version = [System.TimeZoneInfo]::ConvertTimeBySystemTimeZoneId( (Get-Date), "Central Europe Standard Time")
      $Version = $Version.tostring("yyyy-dd-MM-HHmm")
      New-AzTemplateSpec -Name "VirtualMachine" -Version $Version -ResourceGroupName $(resourceGroupName) -Location $(location) -TemplateFile $(Build.ArtifactStagingDirectory)/VirtualMachinen.json
    azurePowerShellVersion: 'LatestVersion'
Using Template Specs to deploy resources
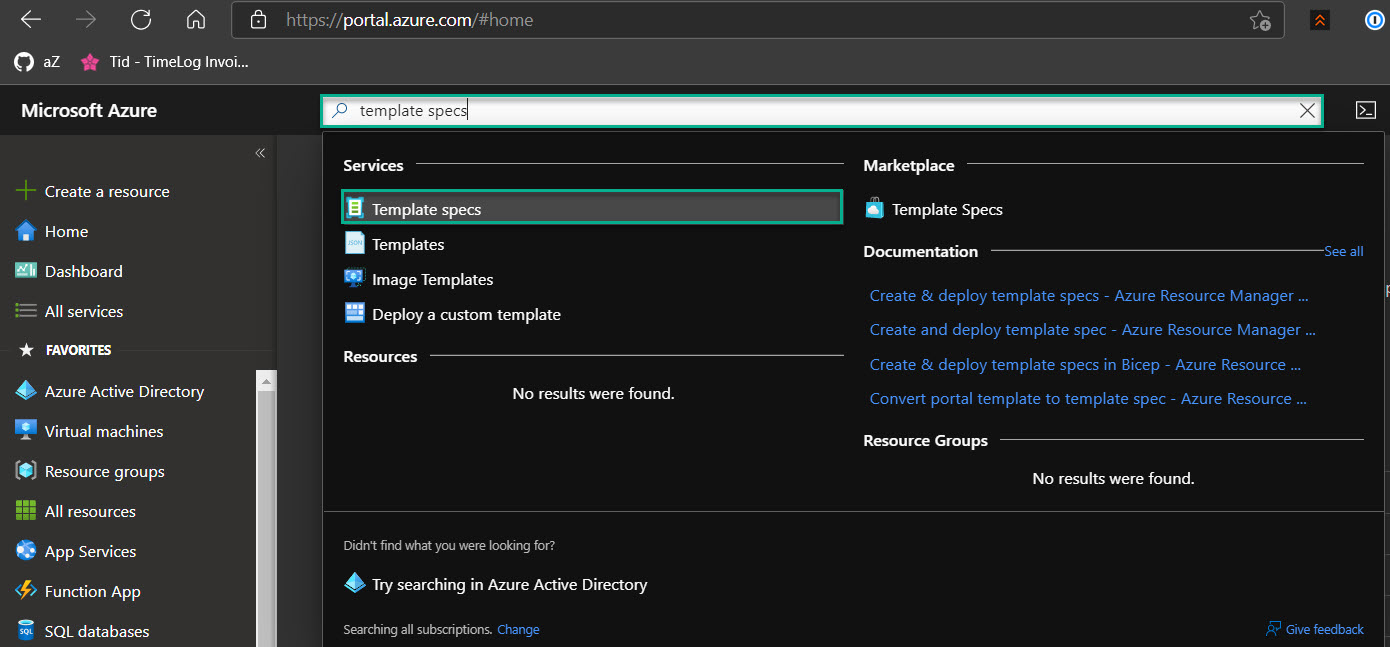
With the template deployed to Azure, I can now use it to deploy a virtual machine. I search for “Template Specs” in the Azure Portal and select it.
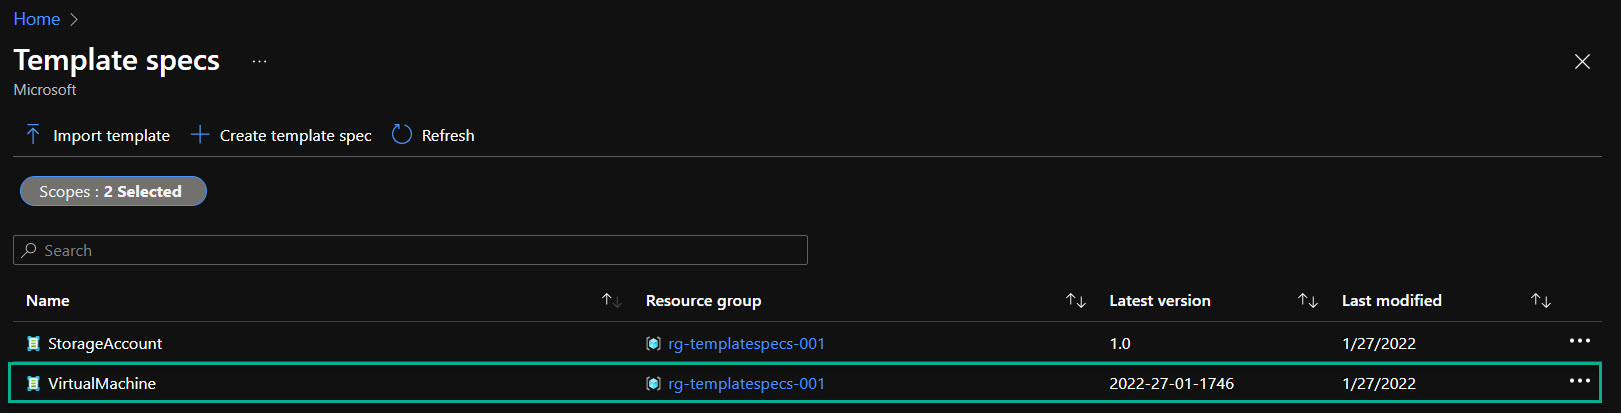
I can see the Template Specs in my environment, and I will click “VirtualMachines.”
I will now click “Deploy.”

I can see some fields are already populated, and I need to provide some information. Below is an example.
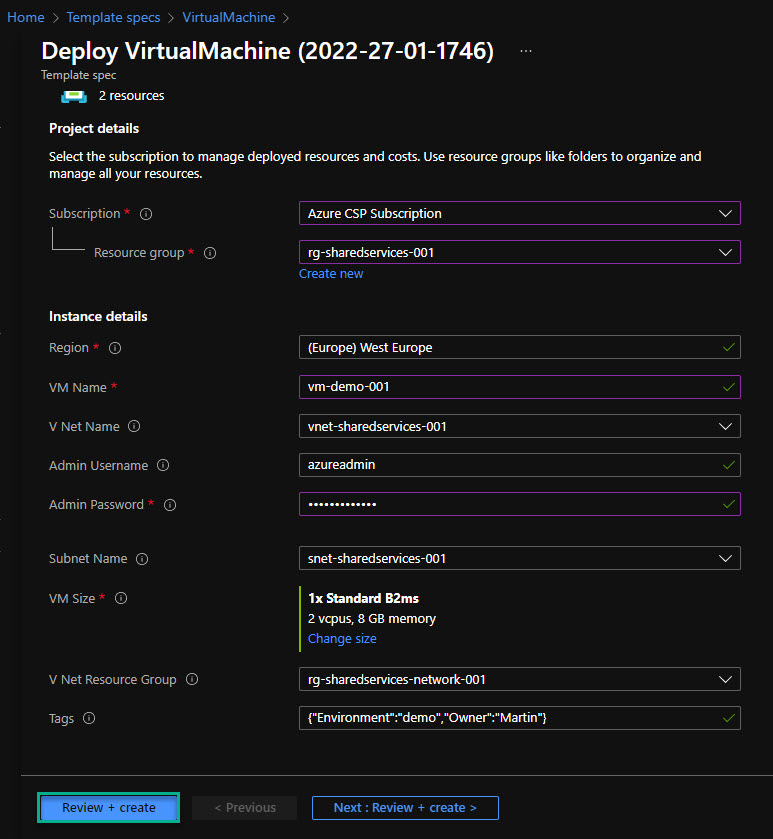
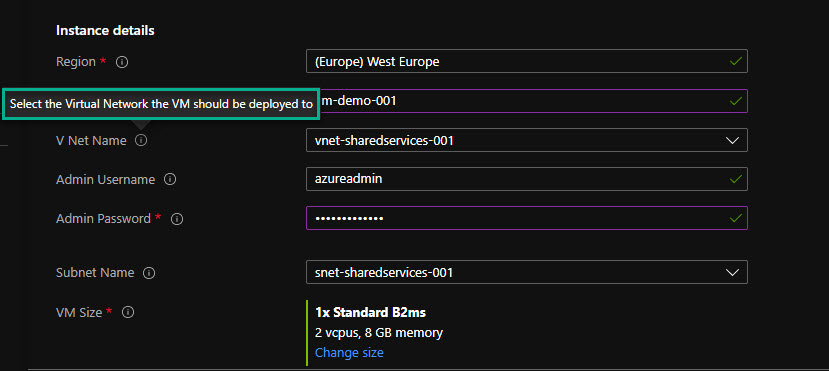
If I hover over one of the (i) I can see the help text that I typed into the description section of the Bicep template.
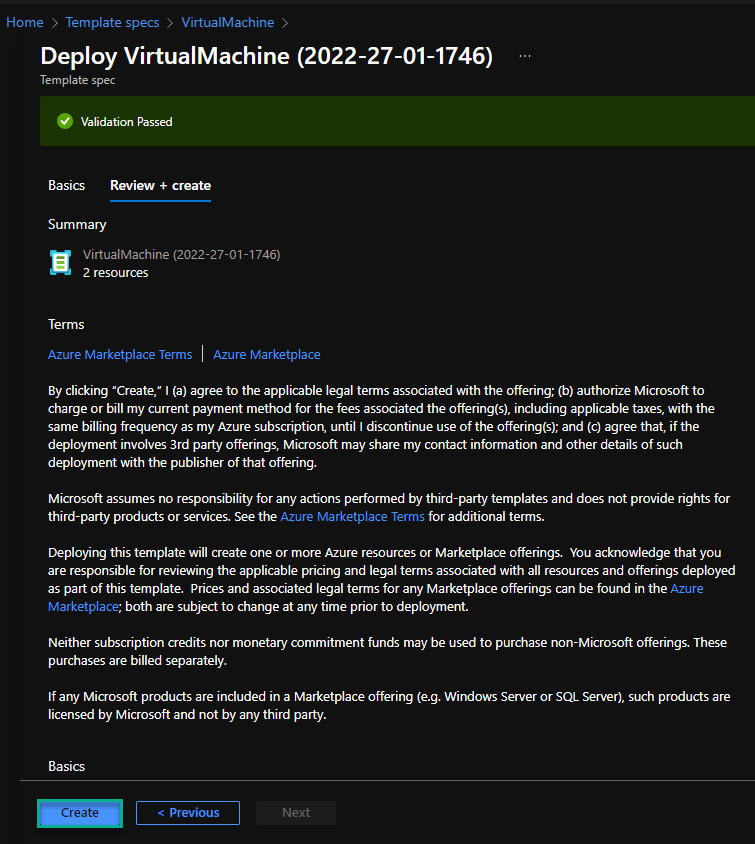
I can click on “Review and Create” and then “Create” to start the deployment.
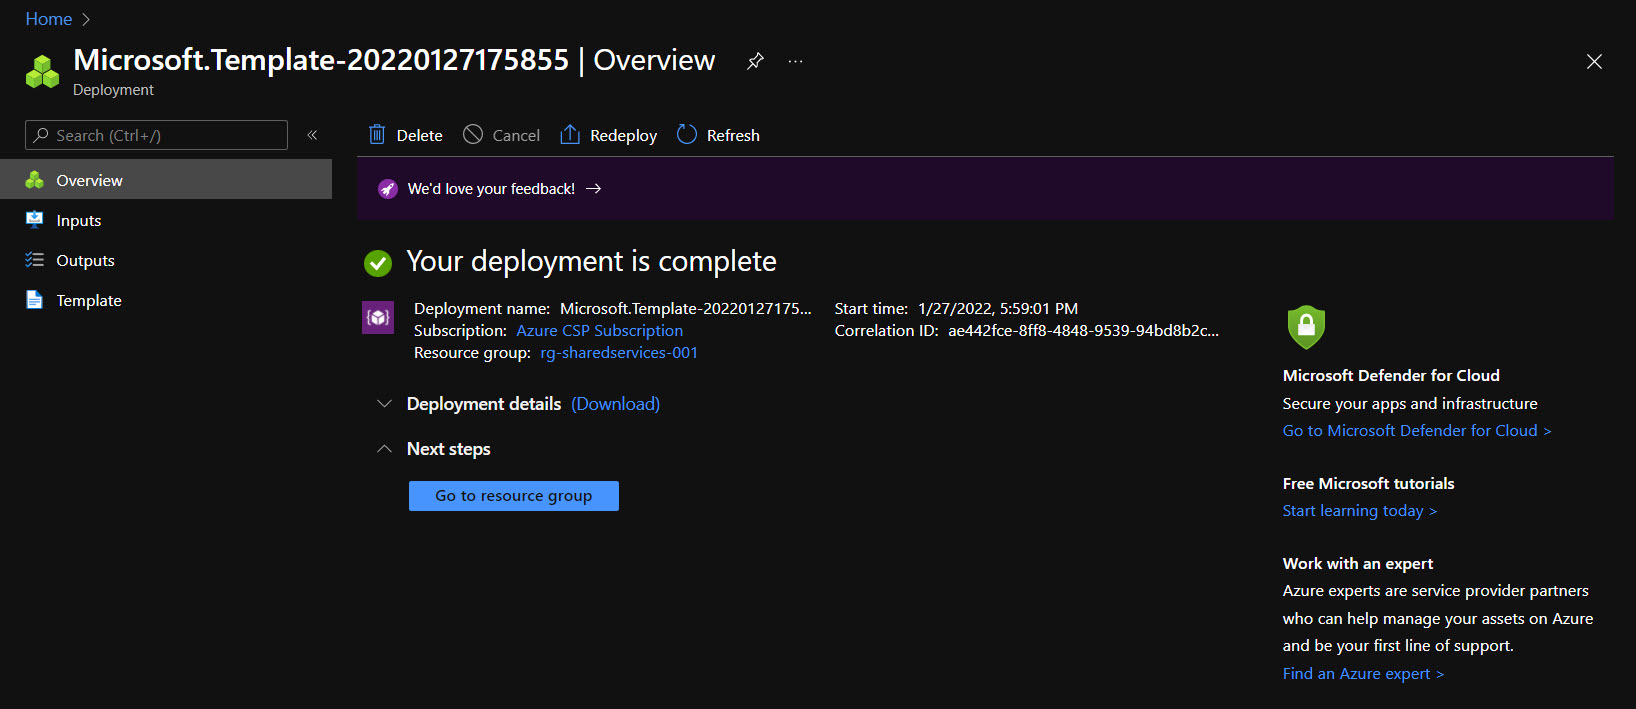
After a few mins, my virtual machine is deployed and ready for use.
Summary
This post showed how to create a Bicep template to create a Virtual Machine in Azure. That same Bicep template can be converted into a Template Specs template using an Azure DevOps pipeline. Doing this ensures that both the Infrastructure as Code consultants and GUI users will use the same template for deployment. The template also has the advantage of ensuring naming standards and that resources deployed to allowed resource groups.
Template Specs uses RBAC roles, ensuring that only allowed users see the templates.
I hope this has been helpful.
Comments